
In this blog post we will show you how to reverse engineer a wireless home alarm using its radio frequency signal and prove that buying a cheap home alarm is not a good deal after all.
Some of the software used for this demo is free or open source, some is proprietary and can be bought online.
The post is composed of 3 parts:
- Presentation of a home alarm
- Reversing it using Universal Radio Hacker (URH)
- Reversing it using PandwaRF Rogue Pro and Gov
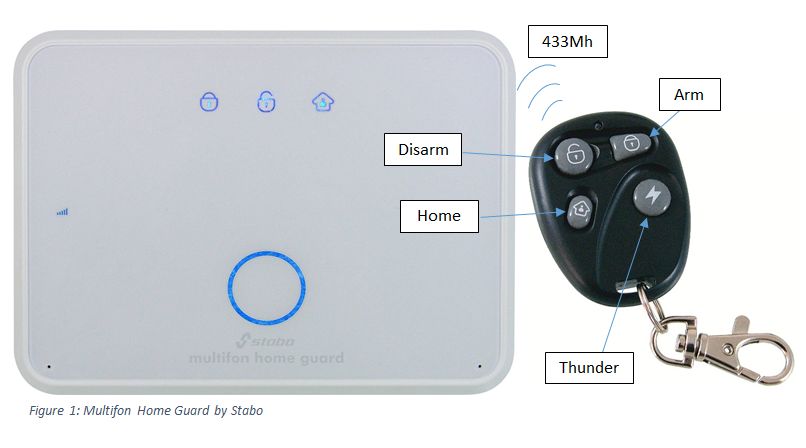
1. Presentation of the Multifon home guard by Stabo
All along this blog post we will work on the Multifon home guard by Stabo.
Specifications:
- Price: 91,99€
- Transmission works on the 433 MHz frequency band
- GSM is used to remote control it with your phone
In the figure 1, you can see the Multifon and what its remote can do:
- Arm: activates the alarm system
- Disarm: switches off the alarm system
- Home: activates the system but in the “At home” mode
- Thunder/Panic mode: initiates an emergency call
2. Reverse engineering the radio frequency signal using URH
Universal radio hacker is an open source software tool that interfaces with many Software Defined Radios (SDR) to capture and analyze radio signals.
URH is an amazing tool, with very advanced features. It is a must have for every wannabe RF reverse-engineer like us.
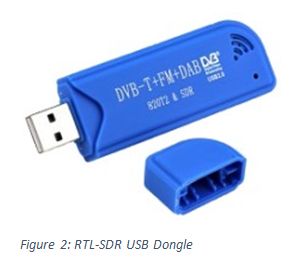
For the HW, we used an RTL-SDR dongle (see figure 2) for 20€.
First you can look at some tutorials on how to use URH.
The first step is to find the transmission frequency of the remote control.
In URH, Go to file -> Spectrum Analyzer and you will see the spectrum analyzer window
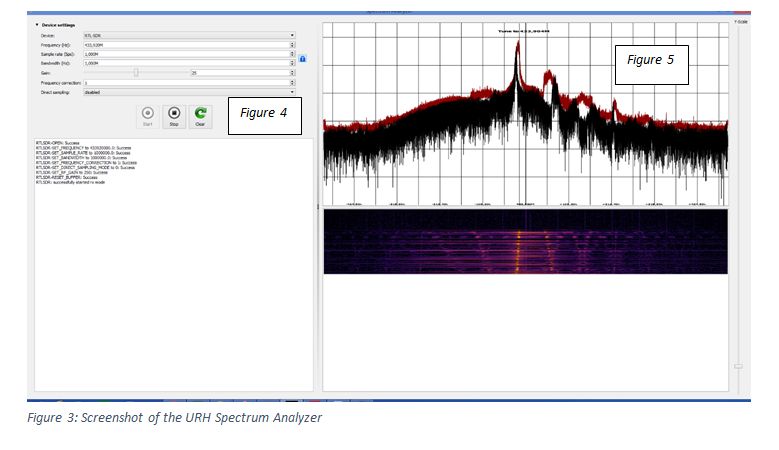
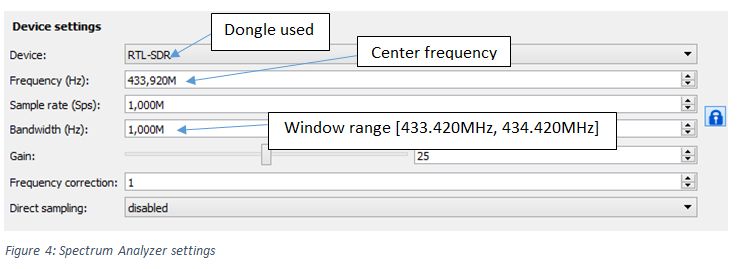
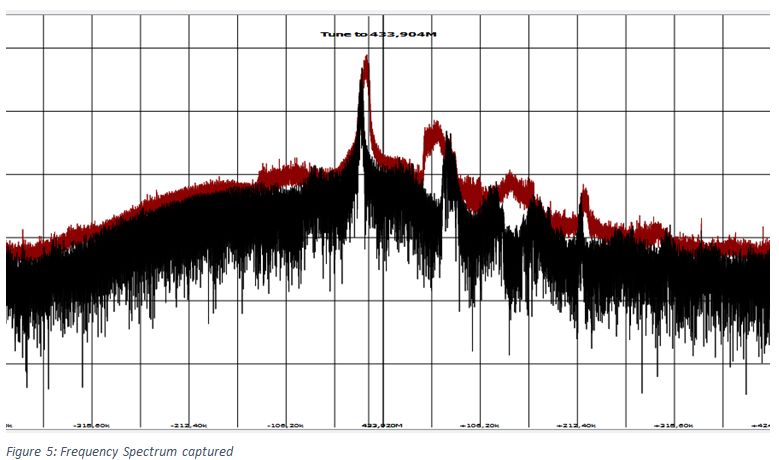
In the figure 5 below you can see the frequency spectrum center at 433,920MHz with 1MHz bandwidth as set before.
There is a peak at 433,904MHz which is corresponding to the frequency on which the remote transmits data. To set this frequency as the center one in URH, you just have to click on the peak.
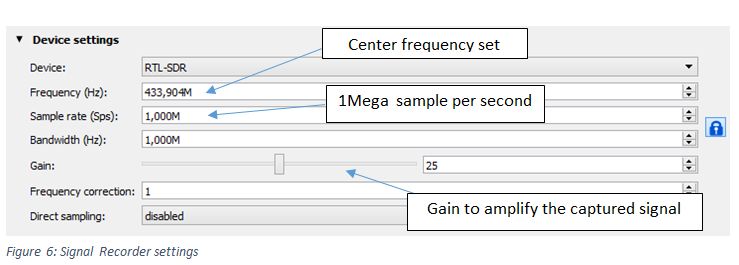
Now that you’ve done this, you can correctly capture the data transmitted by the remote. Close the window and go to File -> record signal. And you will see a window with device settings as previously (fig 6).
After filling out all the settings, you can click the start button. And for the demo I pressed all the Multifon’s remote’s buttons once each.
Let’s see the results in the Figure 7 below:

Now save the captured data and close the window. URH will show the captured signal in the Interpretation tab.
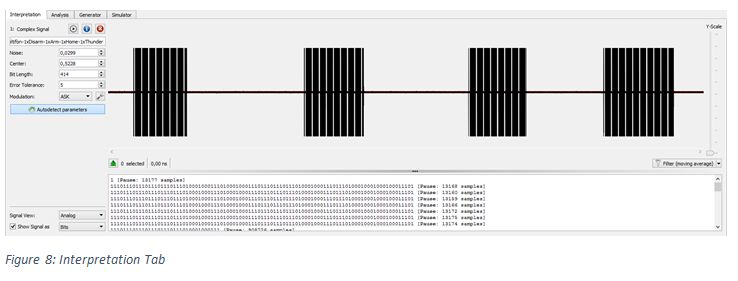

URH supports 3 types of modulation:
- ASK: amplitude-shift keying
- FSK: frequency-shift keying
- PSK: phase-shift keying
We will not explain here the difference between them; you can find a lot of information about modulation and demodulation online. We just use ASK this time because home alarms mostly use the ASK modulation, and more specifically the OOK-On-Off-Keying type.
After choosing your modulation you can use AutoDetect to let URH fill out the parameters for you. But sometimes it doesn’t work, so let’s see how to fill out the parameters manually.
The Noise level (the red band) needs to be higher than the noise and lower than the data. In the end the red band should wrap all the noise but not the data. This is like a filter, where you remove unwanted data.
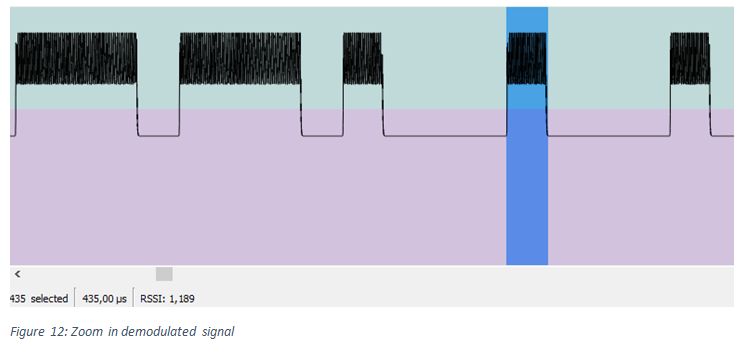
You can easily determine the Bit Length by finding the smaller bit in the demodulated signal (fig 10 and 12). With your cursor wrap all the bit (in blue) and you’ll see under the signal the time that one bit takes to be transmitted (435 µs in fig 12). 435 µs correspond to a data rate of 2298 bits/s.
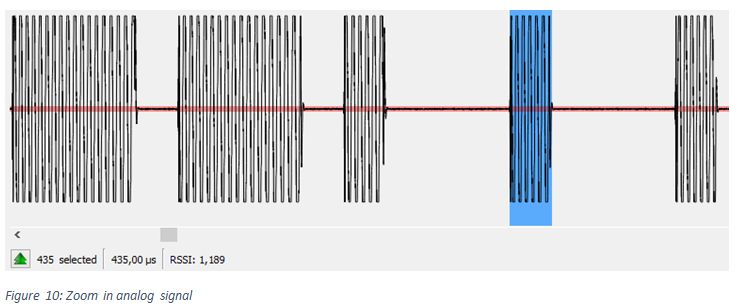
In the figure 11, you can choose how to see the signal: Analog (un-modulated) signal as you captured it (fig 10), Demodulated signal (fig 12) where you can see the bits, or Spectrogram (not used here).
Furthermore, you can see the data under the signal in bits or hexadecimal.

Now go to the Analysis tab:
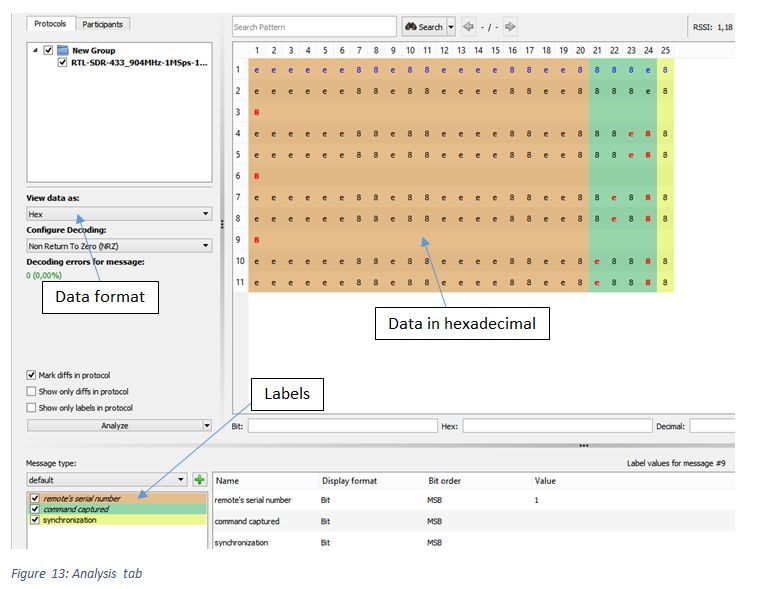
In this tab you can see and analyze the captured data.
For the cheapest alarms the transmitted code is fixed and changes only when the command (Arm, Disarm …) changes or when the remote changes (its serial number).
You can check the Mark diffs in protocol checkbox to easily see the differences (in red) between the first captured data and the others.
You can create labels afterwards to determine which part of the data is dedicated to the command, the serial number or other information, in our case:
- Brown: the remote’s serial number
- Green: the transmitted command (Arm, Disarm…)
- Yellow: the sync symbol
The serial number never changes for all the captured data because we are using only one remote. However, the command is different each time we transmit a new command. This is how we tell the difference between each part of a signal.
This tab allows you to determine the encoding method and create your own decoding strategy. For the Multifon we can easily determine the encoding process: a data bit is encoded by one symbol of 4 bits.
- 1 is encoded by 1110 (0xE)
- 0 is encoded by 1000 (0x8)
This is why, in hexadecimal view, we only see E’s and 8’s.
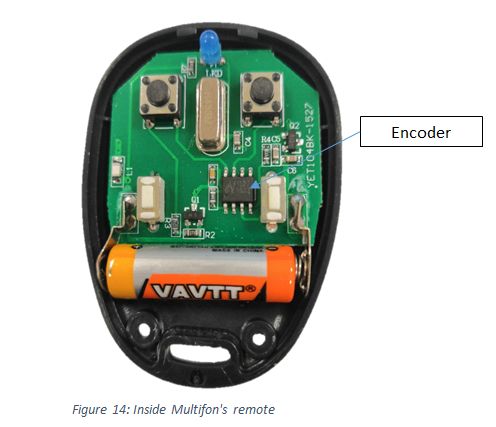
3. Search which encoder your remote is using
To find out which encoding strategy your remote is using: open your remote and on the PCB look for the little chip (see picture) with its name, EV1527 for this example, written on it.
We will see later how this can be useful when using the PandwaRF Rogue Pro below.
Let’s summarize what we have learned so far about the wireless communication protocol of this alarm.
We know:
- The used frequency
- The used modulation
- The data rate
- The number of bits transmitted in a RF frame
- The composition of a RF frame: Serial number, command, synchro
- How the different commands (Arm/Disarm, ..) are encoded
What an attacker would do next:
- Capture one frame of data
- Change the command part, for example change an Arm command into a Disarm command
- Send the fake command
In the next part, we will see how PandwaRF can speed up this analysis part, and quickly impersonate such remote controls.
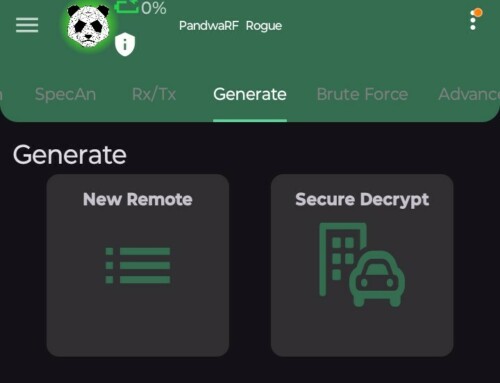
4. PandwaRF makes it easier
The PandwaRF is a RF analysis tool operating the sub- 1GHz range. Its purpose is to capture, transmit, modify and analyze RF data generally transmitted by common objects like keyfobs, alarms, gate openers, etc.…
The following demonstration has been made using PandwaRF Rogue Pro (publicly available) and PandwaRF Rogue Gov (restricted access).
The main difference between Rogue Pro and Rogue Gov is the intelligence of the device and the level of RF knowledge you need to have to operate it.
- The Rogue Gov requires almost zero knowledge, and does almost everything for you.
- The Rogue Pro requires being familiar with some RF technical terms, and is not as automated as the Rogue Gov.
1. Rogue Pro
The PandwaRF Rogue Pro is the mid-range version of the PandwaRF family and is a more advanced tool than the regular PandwaRF. It automatically detects the frequency and you only have to set the modulation. Let’s see with an example:
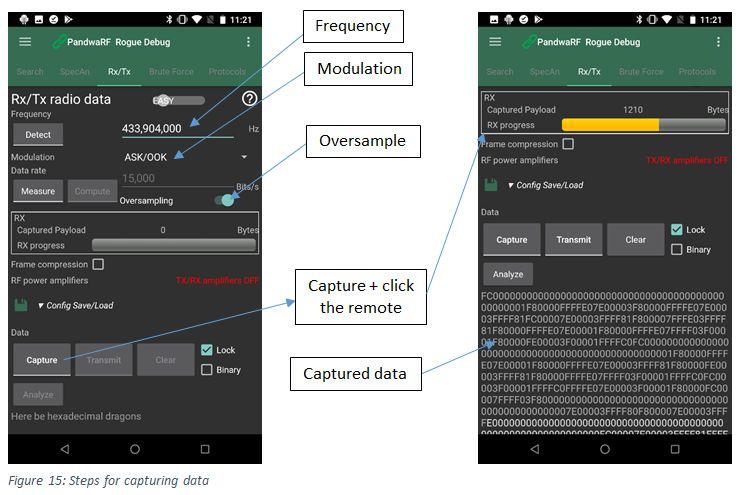
In the Rx/Tx tab, as you can see in Figure 15, you have some parameters to set:
- Frequency of the RF transmission
- Modulation: most of the time (for home alarms) it’s ASK/OOK
- Data rate: the throughput used by the device that you’re capturing data from, in bits/s (if you don’t know it, just switch to oversampling mode and the application will do the rest)
Once the setup is done, click Capture to capture RF data from the remote
Use Analyze and the application will compute the data rate and open the Model searcher to analyze the data.
Model Searcher is a new feature that computes the data rate based on oversampled data, finds the pattern (encoding strategy) and the codeword. And finally it searches in our encoder database which encoders are using this pattern and displays the results in a list.
You can then expand the suggested encoders to modify parts of the codeword and change the original command before transmission. This is known as enhanced replay attack.
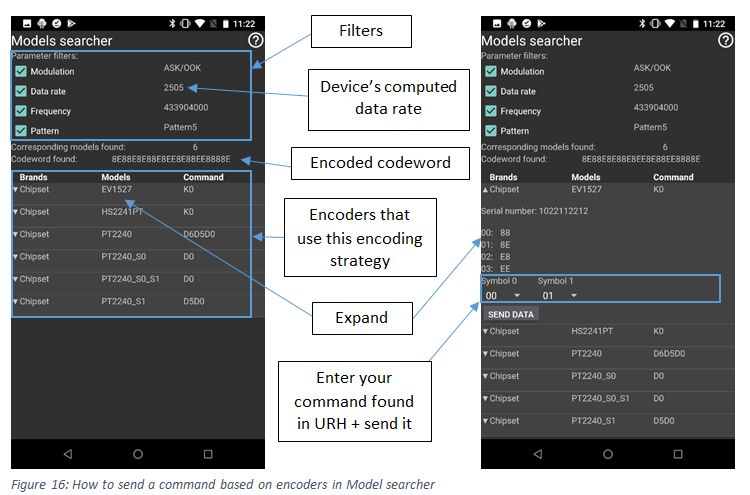
If you find the right encoder in the list (here EV1527) you can expand the item by clicking on it. And you will see (Figure 16) that the serial number is displayed and also all the symbols on which the encoding strategy is based.
The serial number is displayed. In our case: 1022112212
The different symbols used for encoding are also displayed:
- Symbol 0 is coded as 0x88
- Symbol 1 is coded as 0x8E
- Symbol 2 is coded as 0xE8
- Symbol 3 is coded as 0xEE
More or less symbols are dedicated for the command as we previously saw when using URH. For example the EV1527 only has two symbols of 1 byte each that change in order to modify the command (arm, disarm, home mode …). Next, in the Model searcher, use the correct combination of symbols to replay the right command, then press “Send data”.
Another way to do this even more efficiently is using the PandwaRF Rogue Gov.
2. Rogue Gov
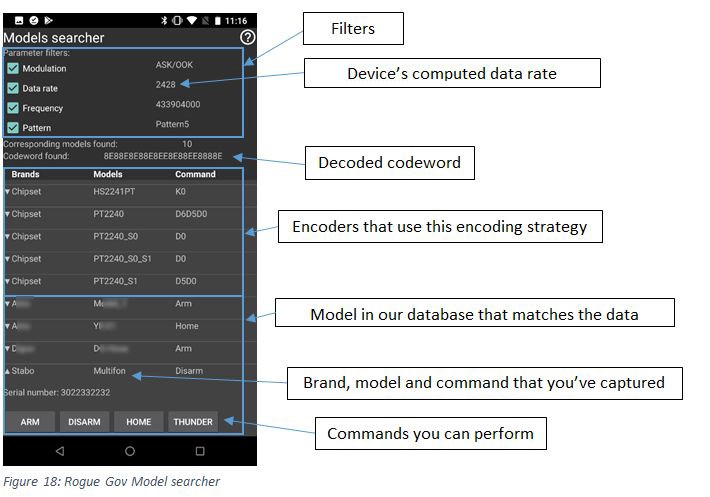
The Rogue Gov is the most advanced PandwaRF version: it embeds a commercial alarm, gate opener and chipset database. It can entirely analyze data, find out which model the data originates from and transmit any command in only 1 click.
Indeed, in the Model searcher of the Rogue Gov, you can see (Figure 18) that not only chipsets are supported, but also other devices like home alarms. So you don’t need to know how radio frequency communications or encoding strategies work. The application will do the job and display all the commands that you can perform with the device. Like the original remote you will see some buttons named Arm, Disarm … and you can transmit it in 1 click.
First of all, like with the Rogue Pro, in the Rx/Tx tab (Figure 17), set all the parameters:
- Frequency
- Modulation
- Data rate (sampling rate) or oversampling mode
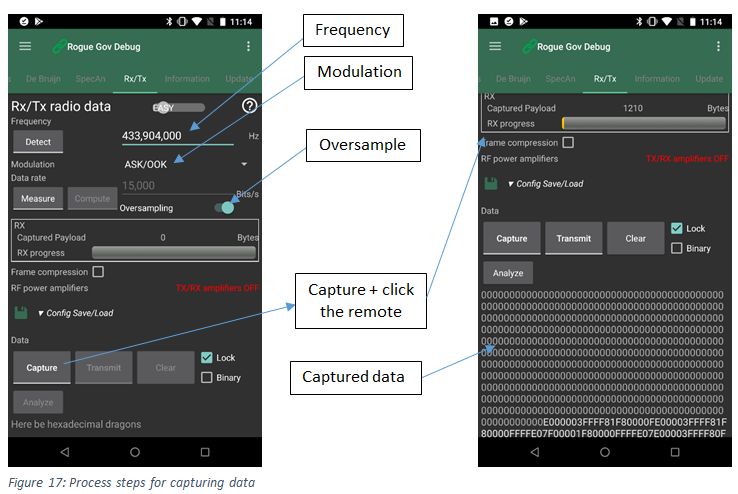
Capture data and analyze it to open the Model searcher, which includes many more items:
- Chipsets, as the Rogue Pro
- Alarm brands and models
Choose the one that matches yours; some models are similar so you may see in the list many items with different names, but same encoding strategy.
In our example we captured data from a Stabo Multifon. When we expand this item we can see all the buttons (commands) that are supported: Arm/Disarm/Home/Thunder. You just have to click the desired one to replay it.
The serial number is also displayed. In our case: 3022332232
Wait, what ? The serial number found earlier with the Rogue Pro was 1022112212. And now it is 3022332232. So how is it possible for the serial number to change ?
In fact the serial number has not changed, but the encoding has changed. You may have noticed that the 2 serial numbers differ only by the values 1 and 3, which are reversed.
This is simply because when we reverse engineered the Stabo model in our lab, we decided to use a different symbol encoding, and we decided (arbitrarily) that the Stabo uses the following encoded symbols:
- Symbol 0 is coded as 0x88 (same as EV1527)
- Symbol 1 is coded as 0xEE (EV1527 uses 0x8E)
- Symbol 2 is coded as 0xE8 (same as EV1527)
- Symbol 3 is coded as 0x8E (EV1527 uses 0xEE)
You can see that you don’t even have to manually change symbols as with the Rogue Pro.
The Rogue Gov does that for you, which reduces the risk of sending a wrong command (a Panic command for example).
As many home alarms on the market today use the same HW, this explains why you can see multiple corresponding brands/models.
Note: This Rogue Gov version is not available for the general public; please contact us for more information.
Conclusion
To conclude, you can see how the cheapest home alarms work and how easy it is to break/hack/impersonate them. With URH you can easily capture and determine if the transmission is secure or not but you need a lot of knowledge in Radio Frequency and decoding methods.
With the PandwaRF you can, in a few clicks and without knowing anything about the device you are capturing data from, break its security and replay any command displayed in the application.
Rather than performing the full RF reverse engineering from scratch, which can take a lot of time and requires some RF knowledge, you can use PandwaRF as an indicator of whether your device is secure or not.
PandwaRF is an analysis tool and must be used for the security evaluation of your own products.